


Turn a Wine Barrel into a functional and decorative Outdoor Sink for outdoor use. You can use a variety of sinks and faucets to achieve the look or budget you want.


Step 1: Materials and tools
Materials:
- A 55-gallon oak barrel
- Bar sink (The one used here is 15″ hand-pounded copper)
- Faucet (I used an oil rubbed brass single lever faucet)
- Copper roofing nails (if using a copper sink)
- Silicone sealant
- Sink drain
- Metal support braces to join the wood of the door
- Hinges, handle and latch
- Water connector (this will vary depending on the water source)
- Drainage Grates
- Connectors to go from drain extender to sump pump connector
- Drain hose
- Plastic glue
- 3/4″ stainless steel screws
- Sandpaper
- Paint for wood and metal
- Painters tape
- Water repellent
- Painting/Staining
Tools:
- Electric drill with titanium bits to drill metal rings and the sink if necessary
- A saw to cut oak
- Hand saw with fine tooth blade
- Screwdriver
- Pliers to shape metal rings and hinges to adapt to the curvature of the wood
- Crescent wrench(s) to join the hose connectors to the faucet.
- Clamps to secure the wood when assembling the door
Step 2: Locate a wine barrel

Step 3: Choose your sink and faucet


This part really depends on you and what you want to use, if and how much you want to spend. You can go the route of using a stainless steel bar sink and just a galvanized pipe and spigot for your faucet or dress it up as I chose. I actually picked up the sink and faucet on eBay. The sink was $160 and the faucet was about $80.
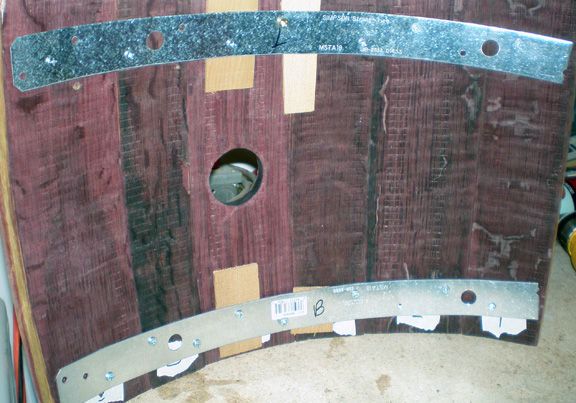
Step 4: Secure the metal around the barrel


Before you can cut any of the staves, you must secure them to the metal rings. I secured this wood by drilling two different holes through the metal ring and the underlying wood. Use 3/4″ #8 stainless screws. The hole through the metal was large enough to allow the screw to pass through, but I drilled the wood with a smaller drill bit to create a pilot hole to prevent the wood from splitting.
Place a screw above and below each wooden stave. Do this process for both the door access and the opening to carry and eliminate the water at the bottom.
Step 5: Create the opening for the door and water


For the door part, I used a miter saw to start cutting the wood and finished the cuts with a jigsaw. For the water and drain access opening, it didn't matter what wood would be removed, so I used a drill to make a pilot hole for the jigsaw to make the cuts. However, you can save the door pieces, so the hand saw gives a clean finish.
Use the top and bottom of two of the metal rings to create a clean straight line. Determine the size of your door. Remember that the barrel consists of vertical strips of wood that may vary slightly in width. Before cutting, locate the ends of the staves at the beginning and end of your opening.
If you want to have a door instead of just an opening, save the wooden slats.
Step 6: Assemble the door


Once the two cuts for the door opening are made, be sure to mark the boards so you know the order in which they should be put back together.
The wood will need to be curved, the metal strips bent and joined together, checking the opening as you go to get the correct curvature of the barrel door. An alternative method would be to connect the metal strips across the top once you cut out the sink opening and connect the metal strips while the barrel is intact.
Step 7: Cutting Sink and Faucet


After finding the center of the barrel, I placed the copper sink upside down on top of the barrel.
Drill a pilot hole on the inside of the sink to make the saw blade cut through the sink. You may have to drill a few pilot holes if you can't turn the saw in the corners of the sink opening. Cut a 1 1/4″ hole for the faucet.
Some boards on the front of the sink were not glued down properly, so it can be secured with a couple of nails/staples as shown.
Step 8: Preparing the exterior

This part is up to you, on how you want the exterior to finish. You could go natural and let it fall over time or treat it to protect the oak and metal.
First sand the metal rings with #000 steel sandpaper to remove any rust. I applied a metal primer and four coats of black satin paint to the rings. Be sure to choose paint that will not react with galvanized metal as some oil-based paints can. Let it dry overnight before installing the sink and faucet.
Step 9: Placing the sink and faucet

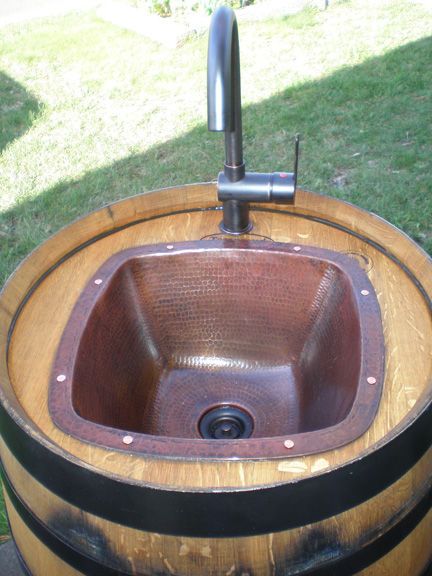

For the sink, drill in eight places to help secure the sink to the wood with the copper roofing brackets. Then drill a pilot hole slightly smaller than the copper nail into the oak through the newly created hole in the sink to prevent the oak from splitting but having some bite into the wood.
I applied a bead of silicone along the edge of the sink opening in the barrel and the faucet opening, placed the sink and faucet in the openings.
Nail the roof in place and then place additional silicon along the outside of the sink, faucet, and top of the barrel for better waterproofing.
Let the silicon dry completely before connecting the water source.
Step 10: Attach the hinges and door


You can use whatever you want to attach the door to the barrel.
Make sure you choose something that allows you to follow the slight curve of the door or is short enough to allow them to fit together.
First, attach the hinges to the door.
Align the hinge with the outside of the barrel to allow the door to open freely.
(You may need to sand or slightly adjust the door or opening to allow the door to close and open easily.)
Step 11: Water and Drain Connections
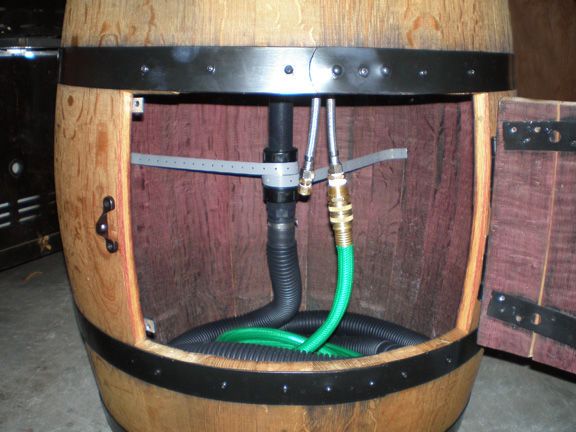


You can create another system to obtainner hot water.
An extension was used for the sink drain. Add pipe adapters to connect the flexible hose (sump pump hose) to the drain. A plastic strap was used to prevent the hose adapter from coming off the pipe extension.
Step 12: Connect to the water
Plug in your water source to check for leaks and proper drainage.
If all goes well, you're done and you can enjoy the look and use of your new wine barrel sink.


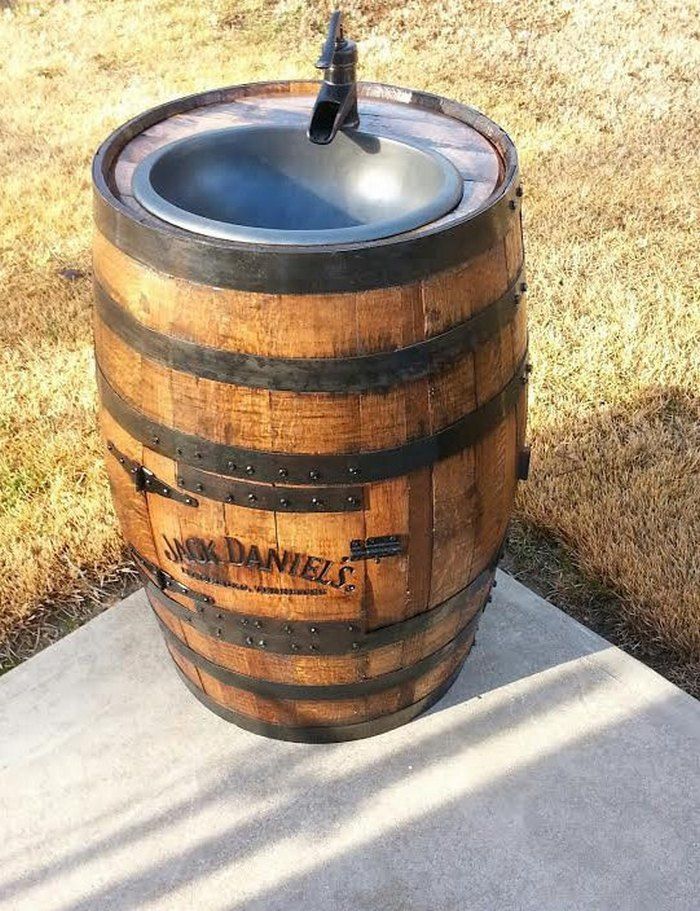


Get more information at perfectionidea.com and on our Facebook for more Turn a Wine Barrel into an Outdoor Sink.
Popular Content
How to make a rocket stove for outdoors
Cardboard Drawers Lined with Jeans
Ideas and Advantages of Window Grilles for the Home!
Latest Articles
How to make a refrigerator out of insulating material: Practical step-by-step guide
How to make a Kilim for the Home: Complete Step by Step Guide
How to protect ourselves from accidents in our workplace: Complete prevention and safety guide
Related Content
The Best Shoe Rack Furniture
56 m² of Environment and Functionality
Lumberjack Table for a Rustic Atmosphere at Home!
How to Decorate your Door for Halloween
Creative Home Decor Ideas to Transform Every Space
Refreshing your home starts with smart design choices that combine comfort, personality, and functionality. Whether you want to modernize a small apartment, upgrade outdoor areas, or create cozy rustic interiors, these trending ideas can completely change the atmosphere of your space.
Outdoor Spaces That Increase Style and Functionality
Outdoor living continues to dominate modern home trends. Homeowners are increasingly investing in practical entertainment zones inspired by these BBQ shed ideas, which create the perfect setup for gatherings and weekend cooking sessions.
First impressions also matter when designing exteriors. Elegant farm entrance gates design ideas help properties stand out while improving privacy and curb appeal.
Compact living solutions are also gaining popularity. These inspiring 16x40 shed house interior design ideas show how smaller spaces can still feel luxurious and functional.
To enhance patios and entryways, homeowners are adding stylish protection with these creative porch awning exterior DIY ideas that blend aesthetics with practicality.

Rustic and Cozy Interior Design Trends
Warm and natural interiors remain timeless. These charming rustic decor ideas combine wood textures, vintage accents, and earthy tones to create welcoming spaces.
Bedrooms are becoming more personalized with curated wall arrangements. Many homeowners use these stylish picture wall ideas for bedroom spaces to display memories and artwork creatively.
Textured wall treatments are another major trend. Installing a board and batten wall adds architectural character while keeping interiors elegant and modern.
Similarly, bold accent wall ideas can instantly transform plain rooms into eye-catching focal points without requiring a full renovation.
Smart Kitchen and Organization Inspiration
Functional kitchens are essential for modern homes. These practical kitchen wall cabinet ideas maximize storage while maintaining a clean and stylish appearance.
Organization also starts at the entrance. Well-designed mud room ideas help families keep shoes, coats, and daily essentials neatly arranged.
Colorful and Personalized Home Styling
Vibrant interiors are becoming increasingly popular thanks to playful dopamine decor ideas that use bright colors and joyful accessories to improve mood and energy.
Gallery walls also continue to evolve as a major decorative feature. These trendy gallery wall inspiration ideas offer creative ways to combine prints, photos, and statement art.
Young renters and new homeowners are especially embracing these stylish first apartment aesthetic ideas to create sophisticated interiors on a budget.
Finally, selecting the right shades can dramatically influence any room’s atmosphere. These modern trendy color ideas help homeowners choose palettes that feel fresh, elegant, and timeless.
Final Thoughts
From rustic charm and colorful interiors to outdoor entertaining areas and functional storage solutions, today’s home decor trends focus on creating spaces that feel both beautiful and livable. By combining smart layouts, modern textures, and personalized decorative elements, any home can become more stylish, comfortable, and inspiring.


